ACD

Name : Name of the Queue / ACD eg Sales, Service etc
Queue ID : Unique id for the queue. This is helpful in transferring calls from one queue to another or for calls outside queue.
Queue Caller Timeout : Maximum time the caller will be on hold before the call is disconnected and flagged as Abandoned. Value option are from 30 sec to 180 sec with a gap of 30sec. In other words, this timeout represents the absolute amount of time to allow a caller to stay in the queue before the caller is removed from the queue.
Music On Hold : You can select different music on hold for different queues which is set here. Setting up MOH is explained under Admin → Settings → Music On Hold.
Context : A context may be specified, in which if the user types a SINGLE digit extension while they are in the queue, they will be taken out of the queue and sent to that extension in this context.
Timeout : This timeout specifies the amount of time to try ringing a agent phone before considering the agent to be unavailable. After this timeout the call shall be transferred to the next available agent based on selection criteria mentioned under Strategy of this menu.
Announce Frequency : How often to announce queue position and/or estimated holdtime to caller (0=off) Note that this value is ignored if the caller’s queue position has changed.
Announce Round Seconds : If this is non-zero, then we announce the seconds as well as the minutes rounded to this value. Valid values are 0, 5, 10, 15, 20, and 30.
Announce Holdtime : Should we include estimated hold time in position announcements? Either yes, no, or only once. Hold time will be announced as the estimated time.
Retry : Retry time gap between transfer of an unanswered call expired by Timeout and trying the next available agent.
Wrapuptime : After a successful call, how long to wait before sending a potentially free member another call (default is 0, or no delay).
Maxlen: Maximum number of people waiting in the queue (0 for unlimited).
Servicelevel : Used for service level statistics (calls answered within service level time frame). In other words goal set by organisation in time taken to attend the call.
Strategy : Various options of ringing pattern chosen for a queue. Valid strategies include:
ringall – ring all available channels until one answers (default)
leastrecent – ring interface which was least recently hung up by this queue
fewestcalls – ring the one with fewest completed calls from this queue
random – ring random interface
rrmemory – round robin with memory, remember where we left off last ring pass
rrordered – same as rrmemory, except the queue member order from config file is preserved
linear – rings interfaces in the order specified in this configuration file. If you use dynamic members, the members will be rung in the order in which they were added
wrandom – rings random interface, but uses the member’s penalty as a weight when calculating their metric. So a member with penalty 0 will have a metric somewhere between 0 and 1000, and a member with penalty 1 will have a metric between 0 and 2000, and a member with penalty 2 will have a metric between 0 and 3000. Please note, if using this strategy, the member penalty is not the same as when using other queue strategies. It is ONLY used as a weight for calculating metric.
Joinempty : This option controls whether a caller may join a queue depending on agent availability. When a caller attempts to enter a queue, the members of that queue are examined. If option Yes is selected then, the caller will be allowed to join the queue and on timeout / caller disconnection, the call shall be treated as Abandoned. If option No is selected then, the caller will be disconnected and will not be allowed to enter the queue and no record of that call will be created in queue reports.
Leavewhenempty : This option controls whether a caller may remain in a queue that he has already joined. The state of the members of the queue are checked periodically during the caller’s stay in the queue. If option No is selected and all of the members are unavailable then the caller will be removed from the queue. If option Yes is selected then, the caller will be allowed to remain in the queue till timeout / caller disconnection, the call shall be treated as Abandoned.
Memberdelay : If you wish to have a delay before the member is connected to the caller (or before the member hears any announcement messages), set this to the number of seconds to delay.
Weight : This indicates Weight of queue – when compared to other queues, higher weights get first shot at available channels when the same channel is included in more than one queue.
Timeoutrestart : If timeoutrestart is set to yes, then the timeout for an agent to answer is reset if a BUSY or CONGESTION is received. This can be useful if agents are able to cancel a call with reject or similar.
Periodic announce frequency : How often to make any periodic announcement.
Ringinuse : If you want the queue to avoid sending calls to members whose devices are known to be ‘in use’ (via the channel driver supporting that device state) use this option. (Note: only the SIP channel driver currently is able to report ‘in use’.).

Various voicefiles are used in queue announcements. You can change your own voice files by uploading in Settings → Recordings section. Different queues can have different voice files for different option’s. You can use Play button to play and verify that right file is there for right option. Default button restores default file for the selected option.
Auto Attendant Option

- To create an Auto Attendant setting, first complete the details portion of the tab. Option New gives the option to create New or Edit is to edit existing option.
- First enter an unique Name for this option and then select various operations for various digits. You can select various options and its respective param as discussed in the subsequent portion of this section.
- You can ADD unlimited option but ensure the digits are unique and finally Submit to save the settings.
- Remove helps you to remove any specific line on the details section.
- To delete the entire details, select that need to be deleted in Edit Mode and press Delete
- You can keep selecting Auto Attendant option and keep building Multi Level IVR

- After storing the details on the header section you have to choose the welcome file as well as failure options (Invalid Code / Timeout) option.

Welcome File : You can select from the set of files you have uploaded under Settings → Recording option
Failure Fallback : Ringing pattern fallback in case of failure. Failure can be either due to timeout(did not dial any valid extension for 4 sec) or invalid (dialled an invalid extension) .
Failure Timeout : This is post successful landing at the desired extension, how long the caller will wait in the event the extension has not picked the call before it gets landed in default fallout extension. The call will land in desired extension as call waiting even if it is busy giving an opportunity to the extension to pick the call and will be transferred to the failure fallback choice post this duration.
- You can have Multiple auto attendant option and can be set for different trunk.
Drone Operator

- Drone is an innovative & unique Incoming option that can automate any repetitive phone calls with standard questions option. eg: Service Call closing, Product enquiry or Service call registration or Complaint registration.
- Your standard questions are recorded as wav files and uploaded in Recording section which can be selected in this option. Duration is the time gap in seconds for the caller to answer the question asked.
- The complete file can then be sent to an email / create a web page to process further.
- Setting up Drone is much like the Auto Attendant with header and footer with details takes multiple questions and time gap for answering.
- You can ADD unlimited option but ensure the digits are unique and finally Submit to save the settings.
- Remove helps you to remove any specific line on the details section.
- To delete the entire details, select that need to be deleted in Edit Mode and press Delete

- After the details are completed as above, you can give email Id if the same has to be forwarded to email or link extension to be displayed in respective user panel
Follow Me
This can otherwise be called as Call Forking. You can make an incoming call to ring in more than one terminal equipment. For eg both your extension & mobile phone simultaneously, that allows you to pick up the call in your mobile if you are not in office. You also can create a Round Robin ringing with time specified so that utmost importance and multiple options are given to every caller.
- In this option the call will be matured immediately on receipt and Hold on Music will be played.
- All your external number ring option uses your telecom resources to connect, incurring cost of connecting an incoming number to your mobile / any other non intercom numbers.
- As multiple options are given, You will also have to press ‘1’ to accept the call or ‘2’ to reject the call.
- Even if one of the recipient rejects the call, the call will not be disconnected but follows the rest of the options till timeout.

Manual
- Manual option is of 2 types 1) RoundRobin 2) Simultaneous
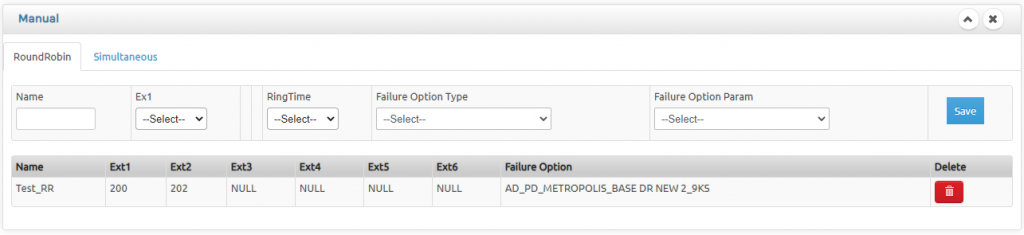
- Round Robin will keep hunting an extension after the other till someone picks up
- You can select the ringing time in every extension in options of 10/20/30/40/50/60 seconds as well as option to route to desired Voicemail if the entire ringing is exhausted.
- In the failure option, you can select and move the call to another type outside round robin thus giving a huge flexibility including voicemail option
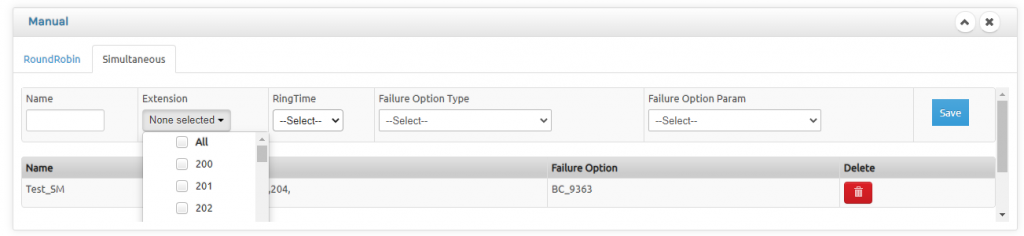
- You can select unlimited number of extensions to ring simultaneously
- You can select the ringing time in options of 10/20/30/40/50/60 seconds as well as a failure option to select with various available ringing pattern
Missed Call Option
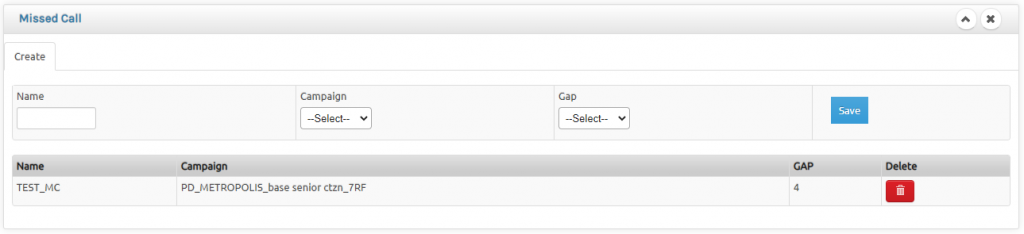
- You can create a missed call on a working extension to start a follow up process eg: TV ads running to give missed call. You can select the time of ringing from 4s, 8s or 15s(preferable is 4s). The calls will be recorded as Missed call in CDR.
- In case you have CCS license activated, this call automatically land in the campaign created for this option and start dialling out and connect to the available agents.
- Using third party services you can initiate an SMS to acknowledge the missed call to the caller.
Caller ID Based Call Transfer(CBCT)

- Customer can map a set of numbers with extensions. On receipt of any incoming call from that number , it will automatically be transferred to the mapped extension bypassing the operator.
- This is an unique set of numbers , hence you can have only one set of numbers.
- Customer can import the number & extension from an excel sheet or can enter one by one as and when it is needed.
- Com1 has gone a step ahead with this feature, for unanswered outgoing calls from Com1, when the call it returned by the external contact within 24 hours, that call will by pass the operator and land with the caller extension number. If many people have called the external contact person, the call will be connected to the last called person.
Random Call Distribution(RCD)

- This mode will check the CDR and randomly ring in extensions which has not received call for a predefined time and is free. The Free time can be the options of 5 to 30 Minutes with the gap of 5 Minutes. For an extremely busy call centre we recommend 5 to moderate 30 minutes gap.
- This will ring at 6 different random extensions meeting the requirement before hanging up.
- You can also set the ringing duration from 10 Seconds to 60 Seconds in the gap of 10 Seconds.
- This method is an easier to adopt ACD option to evenly distribute incoming call traffic with various agents.
- You can have multiple RCD based on Grouping of extensions (Otherwise classified as Departments)
Incoming Mode Settings
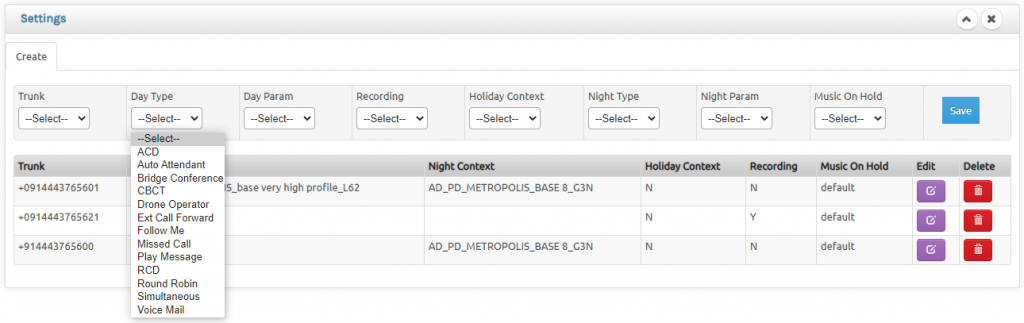
- Various available incoming trunks are listed here for various possible incoming pattern such as RoundRobin, Simultaneous, Drone Operator, Auto Attendant & Missed call as mentioned in various option above as well as Play a file or land in any preferred voice mail.
- You can also set if the call has to be recorded in Recording option eg: If you select No the call will not be recorded in voice logger where as Yes will record the call.
- You can set different Day Mode & Night Mode ringing pattern for every trunk.
- You can also set different Hold on Music Context for every trunk.
- Holiday context indicates if the trunk will be impacted by Manual Day/Night mode or the Holiday settings as explained below. If you select NO, the trunk will have no impact on Holiday mode or Day/Night mode and will continue to work on Day mode 24 X 7 X 365 and if the choice is YES then that trunk will be impacted by both Day/Night settings as well as Holiday settings
Holiday Settings

- This is apart from the manual Day / Night mode.
- Daily: You can select any hour slot in the day (0 – 23) for various ringing pattern automatically. eg – If you want lunch time message to be played in afternoon between 2PM to 3PM or you want the calls to land with security automatically after 6 PM till 9 AM next day or any other requirement like that can be set here. You can have different time for different Days eg- You can have different settings for Weekdays like Monday or a Half working Day like Saturday or a full holiday Sunday.
- Weekly: While the previous option takes care of any hour slot in a day, Weekly option supercedes Daily option and takes care of full day like Sunday / Saturday from 12.00 AM to 11.59 PM
- Yearly: This supersedes the above 2 options by taking care of specific dates eg. Christmas / New Year or any other scheduled holidays as well as unscheduled such as local bandh etc. You can different ringing patterns for different dates. eg: you can play a Happy Xmas message for Christmas as well as announce a local Bandh message on a Bandh day.
- The above 3 combination can virtually give you complete flexibility to plan your ringing pattern to any logical wild expectations from an EPABX.
- Note : Manual Day / Night Mode Setting supersedes the above 3
Incoming Priority In Sequence
- Holiday Setting (Yearly) – Can be bypassed for a trunk by selecting No to holiday setting
- Holiday Setting (Weekly) – Can be bypassed for a trunk by selecting No to holiday setting
- Holiday Setting (Daily) – Can be bypassed for a trunk by selecting No to holiday setting
- Day/Night Setting (Manual) – Can be bypassed for a trunk by selecting No to holiday setting
- Day Mode
Leave a Reply
You must be logged in to post a comment.